
A practical vegetable garden series
A simple guide to fresh fronds, flowers and aromatic seeds.
|
GROW WITH US Dill is a quick, useful herb with more than one harvest to enjoy. Sow it directly in a sunny bed, make small repeat sowings for fresh leaves, and leave a few plants to flower for pollinators and aromatic seeds. Keep the soil moist through hot spells and snip leaves as you cook. |
Written for home gardeners in Hungary
CHAPTER WELCOME
Your dill season starts here
This book follows the whole journey: seed → seedling → garden → care → harvest → kitchen → next season.
Dill is a quick-growing annual herb that brings a fresh, delicate flavour to summer cooking. Its fine, feathery leaves are easy to snip, its yellow flower heads attract pollinators, and the seeds are useful in pickles and baking. Because dill dislikes root disturbance and can flower quickly in hot, dry weather, direct sowing and a few repeat batches make growing it simple.
In Hungary, sow dill directly outdoors from mid-spring to midsummer, once the soil has warmed. Make small sowings every few weeks for fresh leaves over a longer stretch. Near Győr, summer heat can bring on flowering early, so keep the soil moist and sow in a partly sheltered place. Let a few plants flower for their seed heads, then collect the brown seeds in late summer or autumn.
Our Hungarian calendar
|
April |
Sow outdoors once the soil has warmed. |
|
May–June |
Make small repeat sowings every few weeks. |
|
June–August |
Keep plants watered and harvest fresh leaves. |
|
Summer |
Allow selected plants to flower for pollinators. |
|
Late summer |
Collect seed heads when they turn brown. |
|
Autumn |
Dry and store seeds; let a few fall naturally. |
|
WHAT I WOULD DO I would sow a short row in April and a little more every few weeks until midsummer. I would use the leaves fresh as I cook, then leave two plants to flower and set seed for pickles and next year’s garden. |
The rule for this series: dates guide us, but the plant and the weather make the final decision.
CHAPTER 1
Meet the Dill
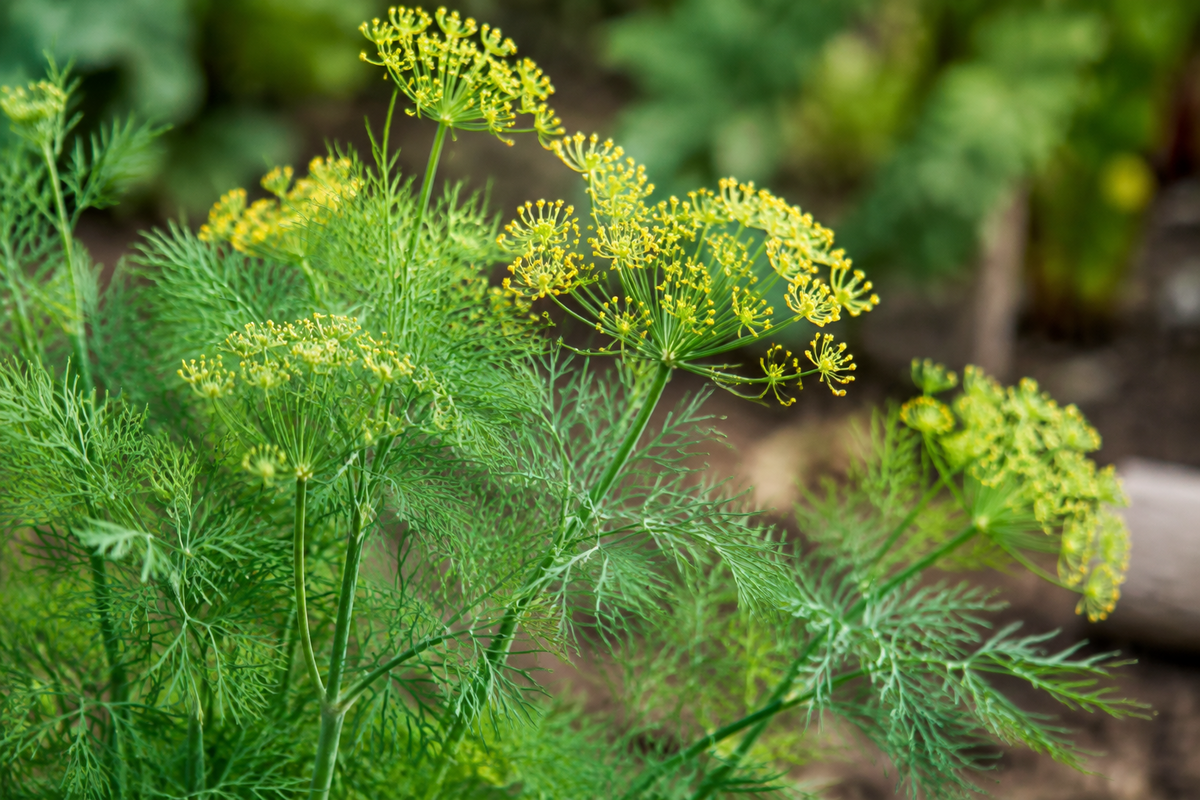
Dill grows airy, finely divided leaves and umbrella-shaped yellow flower heads.
Dill (Anethum graveolens) is an annual herb in the carrot family. Its soft, aromatic leaves are often called dill weed, while its dried fruits are used as dill seed. Plants usually grow upright and may reach around 90 cm or taller, with delicate foliage and flat clusters of tiny yellow flowers. Harvest the leaves, flowers or seeds depending on how you want to use the plant.
Leaves, flowers or seeds?
|
Leaf harvest |
Snip feathery dill leaves while plants are leafy. |
|
Seed harvest |
Let flowers mature, then collect dry brown seeds. |
One plant, several useful harvests
· Dill leaves: tender, feathery fronds for fresh cooking.
· Dill flowers: yellow umbels that attract pollinators.
· Dill seeds: aromatic dry fruits for pickling and baking.
· Direct sowing: avoids disturbing the long taproot.
· Succession sowing: keeps young leaves coming through summer.
· Annual herb: may drop seed and appear again next year.
|
GOOD TO KNOW Dill leaves, yellow flowers and seeds are all edible. The seeds have a stronger, warmer flavour than the delicate fresh leaves. |
CHAPTER 2
Choose Your Dill
Choose a variety for the leaf harvest you want, and decide whether you will leave some plants to flower and set seed.
Ask yourself five questions
1. Do I want lots of fresh leaves or seed heads for pickling?
2. Can I sow dill where it will grow without moving it later?
3. Do I have a sunny, sheltered place with free-draining soil?
4. Can I sow small batches every few weeks?
5. Would I like a compact variety for a large pot?
A beginner-friendly first planting
|
Sow in place |
Dill has a taproot and dislikes being moved. |
|
Sow in batches |
Repeat every few weeks for more young leaves. |
|
Water in heat |
Dry weather can make plants flower early. |
|
Keep some flowers |
They attract pollinators and form seed. |
|
A COMMON MISTAKE Starting dill in a crowded tray and transplanting it late. Its taproot is easily disturbed; direct sow where you want it to grow. |
|
TRY THIS Sow one variety for leaves and another for seed. Compare how their height, flowering time and flavour differ. |
CHAPTER 3
Let’s Sow
Dill grows quickly from seed and is best sown where it will mature. Its taproot makes transplanting tricky, so direct sowing is the easiest method. Small, repeated sowings are more reliable than one large row: young plants provide leaves while older ones move on to flowers and seed.
When to sow in Hungary
Sow outdoors from April to July, once the soil has warmed and is easy to work. Choose a sunny, sheltered spot with soil that drains well. Rake the surface fine, water the base of a shallow drill, then sow seeds thinly about 1 cm deep. Leave about 30 cm between rows. When seedlings are large enough to handle, thin them to roughly 20 cm apart. Repeat a short row every two or three weeks for a steady supply.
What you need
· Dill seeds, preferably a variety suited to your space
· A hand fork and rake for preparing the bed
· A watering can with a fine rose
· Labels and a pencil for sowing dates
· A sunny bed or a deep container with drainage holes
Sowing, step by step
1. Weed the bed and loosen the surface without making it powdery.
2. Make a shallow drill about 1 cm deep and water it gently.
3. Sow seeds thinly, cover lightly and label the row.
4. Keep the soil moist while seeds germinate, usually within one to two weeks.
5. Thin seedlings to around 20 cm apart, using the thinnings in the kitchen.
|
DON’T PANIC A tall yellow flower head is a normal part of dill’s life cycle. The leaves slow down after flowering, but flowers and seeds are useful too. |
|
A COMMON MISTAKE Sowing all the dill at once. Plants may flower close together; repeat sowings keep fresh leaves coming for longer. |
CHAPTER 4
Seedling School
Dill seedlings are fine and delicate at first. Give them even moisture and enough room, then leave them in place so their taproots can develop.
Spot the dill seedlings
Dill seedlings have narrow, feathery first leaves and grow upright on slender stems. Keep the bed free of weeds so tiny seedlings do not have to compete. Thin crowded plants early, snipping extras at soil level rather than pulling beside the seedlings you are keeping. This avoids disturbing the roots of the remaining plants.
Why are the seedlings crowded?
Dill seed is small, so it is easy to sow more thickly than intended. If too many seedlings appear, thin them gradually until each plant has space to grow. Use the tiny thinnings as a garnish. Do not try to move older seedlings to another bed: dill has a taproot and usually settles best where it was sown.
Water while they settle
Keep the soil gently moist from sowing until seedlings are established. Water at the base with a fine rose so the light seeds and seedlings are not washed away. Small plants have shallow roots, so check during warm, dry weather. Once plants are larger, water when the soil begins to dry.
Feeding
Dill does not need heavy feeding. It grows well in ordinary, reasonably fertile garden soil. If the bed is poor, mix in a little mature compost before sowing. Too much rich feed is unnecessary and can encourage soft growth; container plants may need an occasional light liquid feed if growth slows.
|
WHAT I WOULD DO I would sow dill near the kitchen door in a sunny, sheltered bed, then keep one deep pot of compact dill on the patio for easy picking. |
|
DON’T PANIC Dill seedlings look fine and delicate at first. Thin them gently and keep the soil moist; they will soon become recognisable feathery plants. |
CHAPTER 5
Ready for the Real World
Dill is usually sown directly into its final place. If you started seedlings in modules, move them while very young and disturb the roots as little as possible.
Before planting: check the plants and the bed
1. Choose a sunny, sheltered place with free-draining soil.
2. Water module-grown seedlings before moving them.
3. Harden them off gradually if they were raised indoors.
4. Prepare the final site before lifting any seedlings.
5. Plant while seedlings are young; water gently at the base.
When is it ready in Hungary?
Direct sow outdoors from mid-spring to midsummer. In many Hungarian gardens, April through July works well once the soil has warmed. Dill tolerates cool spring weather, but cold, soggy soil slows it down. If starting in modules, sow one seed per cell and transplant very young seedlings carefully before their taproots grow long.
Around Győr, a sunny spot with some shelter helps tall dill stems cope with wind. In hot, dry spells, water the plants to delay premature flowering, especially if you are growing them for leaves. Make a later sowing in early summer so fresh foliage is available into autumn; leave a few earlier plants to flower and form seed.
|
A COMMON MISTAKE Cutting every leaf from a small plant. Leave at least one-third of the foliage so dill can continue to grow. |
|
GOOD TO KNOW Dill may self-sow if seed is allowed to fall. A few seedlings can appear in spring near the original planting place. |
CHAPTER 6
Give Them a Good Home
Dill needs sunshine, shelter and soil that stays lightly moist without becoming waterlogged.
The right place
Choose a sunny, sheltered bed with fertile, free-draining soil. Dill can grow nearly a metre tall, so give it room and avoid a very exposed position. It also grows in a container, especially compact varieties, but the pot must be deep enough for its taproot. Sow in the final spot because older dill seedlings do not transplant readily.
Spacing
Allow about 20 cm between plants and 30 cm between rows. This gives each plant room to branch and allows air to move through the foliage. A compact variety can grow a little closer, while tall varieties may need more space or a small stake in a windy position. Follow the seed packet for named varieties.
Planting day
1. Water the seedlings and prepare the final planting place.
2. Make a hole deep enough for the whole root plug.
3. Set the young plant at the same depth it grew in its module.
4. Firm gently and water well at the base.
5. Protect new seedlings from slugs while they establish.
Growing in pots
Use a container at least 30 cm wide and deep, with drainage holes and fresh potting mix. Compact varieties are easier to manage in pots. Sow directly into the container so the taproot is not disturbed, then thin to the strongest plants. Place the pot in full sun and check moisture regularly, as compost dries quickly in warm weather.
|
TRY THIS Stir chopped dill into warm potatoes just before serving, with butter, lemon zest and a pinch of salt. |
CHAPTER 7
Water, Feed & Keep Them Growing
Regular watering and small repeat sowings help dill stay leafy through summer.
Watering
Dill needs extra water during hot, dry weather. If the soil dries out, plants may flower early and stop producing as many leaves. Water deeply at the base, especially in containers, and check pots frequently. Avoid waterlogging; dill dislikes cold, soggy conditions. Regular leaf picking also helps keep the plant bushy.
Mulch
A light layer of fine compost around established plants can slow water loss and suppress weeds. Keep mulch away from the slender stems. Do not mulch over tiny seedlings, which need light and air at the soil surface. In pots, a thin compost top-dressing can help hold moisture without covering the crowns.
Feeding
Dill in garden soil rarely needs additional feeding if the bed is reasonably fertile. A little compost before sowing is usually enough. If container plants look pale or stop growing, check watering first, then use a mild liquid feed according to its label.
Keep plants healthy
Thin crowded seedlings, weed carefully and keep the soil from drying out in hot weather. Tall stems in exposed places may need a small stake. Slugs can damage seedlings, while aphids may gather on soft new growth. If your main aim is leaves, pinch out flower stems as they appear; let a few plants flower if you want seeds and pollinators.
|
WHAT I WOULD DO I would pick leaves from young plants, then allow a few older plants to flower and make seeds for pickling. |
CHAPTER 8
Flowers, Leaves & “What Is That?”
Dill’s flat yellow flower clusters rise above its feathery foliage and are easy to spot in summer.
Why is my dill flowering already?
Hot, dry weather can cause dill to bolt, meaning it flowers earlier than you hoped. This is natural for an annual herb, but leaf production slows once the plant flowers. Keep the soil moist, sow in small batches through summer and choose a slow-to-bolt variety if you mainly want foliage. You can still use the flowers and collect seed from an older plant.
The beginner’s trouble guide
|
Plants flower too soon |
Hot, dry weather can trigger bolting. Water in dry spells and sow another small batch. |
|
Seedlings disappear |
Slugs may be feeding at night. Check the bed after dark and protect young plants. |
|
Plants are crowded |
Thin seedlings gently to about 20 cm apart. |
|
Leaves wilt quickly |
Dill leaves are delicate. Harvest close to use and keep the soil from drying out. |
|
Stems lean in wind |
Tall plants may need a small stake in exposed places. |
|
DON’T PANIC Once dill flowers, it can still be useful. Use the flowers in pickles or leave them to form seed for cooking and sowing. |
|
A COMMON MISTAKE Letting the soil become bone dry during hot weather. Water at the base to help dill stay leafy for longer. |
CHAPTER 9
Can I Pick It Yet?
Yes—when the leaves are long enough to snip, often about six weeks after sowing. Pick sparingly from young plants and leave at least one-third of each plant to keep growing.
What “ready” looks like
Harvest leaves once the plant is established and has plenty of feathery growth. Snip a few leaves at a time, leaving at least one-third of the plant in place. The yellow flowers are edible too. For dill seed, wait until the flower heads dry and the seeds turn brown, then cut the stems before the seeds drop.
Harvest leaves, flowers and seed
|
Fresh leaves |
Snip from established plants, leaving one-third in place. |
|
Flower heads |
Use fresh or leave them for seed and pollinators. |
|
Green seed |
Wait until seed heads dry and turn brown. |
|
Ripe seed |
Cut heads into a paper bag before seeds scatter. |
How often should I check?
Check the row every few days as plants grow. Pick leaves regularly for fresh use, and make another sowing every few weeks so you have young foliage after the first plants flower. If you want seeds, mark a few strong plants and stop picking their flower heads. Cut the ripe brown seed heads into a paper bag and let them dry fully indoors.
|
READY TO HARVEST? Snip leaves once the plant has plenty of feathery growth, often about six weeks after sowing. For seed, wait until the heads dry and the seeds turn brown. |
|
TRY THIS Rub a ripe dry seed between your fingers and smell it. Its warm, concentrated aroma is different from the fresh leaves. |
CHAPTER 10
From the Garden to the Kitchen
Dill’s soft leaves, flowers and seeds each bring a different flavour to the kitchen.
The first rule: use the leaves fresh
Snip dill leaves just before you need them and rinse gently. Their flavour is delicate, so stir them into a dish near the end of cooking rather than boiling them for a long time. Dill pairs especially well with potatoes, fish, eggs, cucumbers, yoghurt, salads and dips. The yellow flowers can season pickles, while dried seeds have a stronger, warmer flavour.
Match each harvest to the dish
· Fresh leaves: stir into potatoes, eggs, fish or yoghurt dips.
· Flowers: add to pickling jars or use as a garnish.
· Dill seeds: use in pickles, breads and cooked vegetables.
· Tender stems: chop finely with the leaves for salads.
|
FROM THE KITCHEN Dill yoghurt dip: stir chopped fresh dill into thick yoghurt with grated cucumber, lemon juice and a little salt. Chill briefly before serving. |
Storing fresh dill
Fresh dill wilts quickly, so use it soon after cutting. Stand the stems in a little water in the refrigerator or wrap them loosely in a damp cloth. For longer keeping, chop the leaves and freeze them in small portions. Dried leaves lose some of their delicate flavour, so store them airtight and use within a few months.
When you have more than you can use
Let a few plants flower and collect the seeds for pickles or next year’s sowing. Cut whole stems when the seed heads turn brown, place them in a paper bag and hang them upside down until the seeds fall. Store fully dry seeds in an airtight jar. Succession sowing helps keep leaf harvests coming without producing a large glut.
CHAPTER 11
Next Season Starts Now
A few notes about sowing dates, leaf harvests and flowering will help you keep dill on hand next summer.
Keep a tiny garden record
· Variety name and whether it was compact or tall
· Dates each batch was sown
· When the first leaves were ready to snip
· How quickly plants flowered in summer heat
· Which sowing gave the best leaf harvest
· When seed heads turned brown and dry
· Which varieties you would sow again
Saving seed and planning another crop
Dill is easy to save seed from. Leave a few healthy plants to flower and wait until the seed heads turn brown and dry. Cut them before the seeds scatter, dry them fully in a paper bag and store the seeds in a cool, dry place. Dill may also self-sow in the garden, so seedlings can appear next spring wherever ripe seeds fell.
1. Choose a healthy plant with plenty of aromatic leaves.
2. Let its flower heads form and mature instead of cutting them.
3. Wait until the seed heads dry and the seeds turn brown.
4. Cut seed heads into a paper bag before seeds scatter.
5. Dry completely, label the year and store in an airtight jar.
|
GOOD TO KNOW Use dill leaves soon after picking; they wilt quickly. Add them at the end of cooking to keep their delicate flavour. |
|
WHAT I WOULD DO I would freeze extra chopped dill in small portions, then use it in soups, sauces and potato dishes through winter. |
COME GROW WITH ME
DILL CHEAT SHEET
The page to come back to when you have soil on your hands and no time to reread the whole book.
|
SOW |
April–July |
About 1 cm deep; rows 30 cm apart |
|
GERMINATE |
Moist soil; usually 1–2 weeks |
Thin to about 20 cm apart |
|
POSITION |
Full sun and shelter |
Deep pot for compact varieties |
|
PLANT |
Best direct-sown in place |
Avoid disturbing the taproot |
|
HARVEST |
Leaves in about six weeks |
Flowers and seed later in summer |
|
Water |
Keep soil moist in dry, hot weather. |
|
Feed |
Use fertile soil; little extra feed is needed. |
|
Thin |
Give plants about 20 cm of room. |
|
Harvest |
Snip leaves regularly; leave a third to grow. |
|
Flower |
Leave selected plants for pollinators and seed. |
|
Next season |
Save dry seed or let it self-sow. |
|
HUNGARY IN ONE LINE Direct sow dill from spring to midsummer, water during hot spells and harvest leaves, flowers or seed as you need them. |
COME GROW WITH ME • DILL
Horticultural reference: RHS, How to grow dill. Seasonal guidance is adapted for Hungarian home gardens.